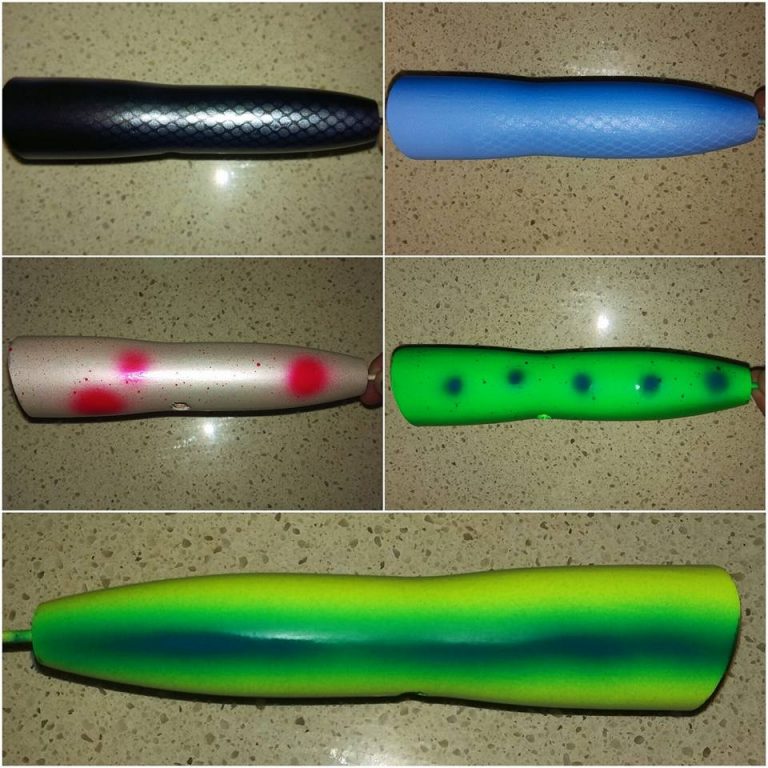
A HOBBYIST’S GUIDE TO HANDCRAFTED GT POPPERS – Tom Smith
A HOBBYIST’S GUIDE TO HANDCRAFTED GT POPPERS
By Tom Smith
Yesterday afternoon was cool. As I sit down to begin writing this article I marvel at the memory of the biggest GT I have ever seen in real life full-breach as it attacked my popper. My popper, the one that I bought as a block of Surian Cedar from Peninsula Timbers, the one I carved on my wood lathe in the shed.
What a compliment from THAT GT! I whooped and hollered as if I landed the brute-but in reality it didn’t find the hooks (sad face). That’s alright with me though, because yesterday also marked one week since I actually landed my PB land-based GT of 20 plus KG… At night… On the stones, with another one of MY poppers. I tell you what, the satisfaction of landing a big fish is so much better when it’s on your very own handcrafted lure!
So if you have ever toyed with the thought of handcrafting big timber poppers, DO IT. Do it now, and HERE’s HOW!
PHASE ONE: GET MOTIVATED
You’re past the first paragraph and still reading, so that’s as good a start as any. Seriously though, motivation is important, as you’re about to embark upon a bit of a journey. I’m 10 months into mine and things are just beginning to all come together nicely, and hopefully a few useful teachings from me to you will quicken your success. Let me, if I may, explain the motivating forces that led to my lure making endeavours: living remote (I live remote) forces one to embrace a heightened degree of independence and autonomy of life. This, combined with the fact that where I tend to fish is a hellish combination of untameable fish and unforgiving terrain AND the fact that one weekend I literally lost fourteen (intensely whispers “fourteen”) poppers was motivation enough to ‘have a crack’. Honesty, 14 poppers…
PHASE TWO: TOOL UP (embrace an excuse to buy more tools)
“Tool Up?” Seriously, not my best heading… Nevertheless it is accurate, and there are a few tools that you simply must get your mitts on. Let’s start with the glaringly obvious-yep, a wood lathe. “Holy budget!” You may exclaim-“aren’t they like the size of a piano and hundreds of thousands of cents?!” Well they can be, but all you need is a small hobby lathe or, like me, a benchtop lathe. These you can pick up new for less than $400 and are far cheaper than that second hand.
My little old Sherline benchtop lathe is driven by an electric motor that is connected to a pulley on the headstock by a fan belt; I use literally the most basic, rudimentary hobby lathe of all time, but who cares! It gets the job done with gusto (FYI it cost me $150 bucks)
Next up is a carving tool (wood turning tool). The only one you truly need is the one that looks like a dish-it’s called a gouge and there are a few variations. The purpose of this tool is to produce smooth, gently sloping curves. I wouldn’t hesitate to check Gumtree for second hand bargains. I sharpen my gouge with an ordinary sharpening stone, and by following the curves of the blade I have had no problems with this at all.
I consider an airbrush as a luxury item if you are just starting your popper making journey. I put off buying an airbrush for ages; I made and used plenty of my own poppers before I decided they were worthy of the fine finishing detail that only an airbrush can provide. For future reference, the airbrush that I settled on was quite a good one-the Iwata Revolution HP CR with a 0.5 size needle. The airbrush, of course, is driven by a small volume compressor that can deliver up to 60 psi. In new condition, these tools will cost you at least $300-$400, hence I recommend abstaining from such purchases while you are just ‘starting up’.
The remaining, necessary tools for handcrafted GT popper production are pretty common, and you probably already have most of them-they are as follows: centre punch, hammer, hack saw, cordless drill (13mm chuck), drill bits up to 12mm (including 3 and 4mm long shaft bits), 12mm spade bit, 1 ½ inch core box bit, and because I pour my own tail weights, a butane burner.
PHASE 3: SUSPICIOUS LATHEY WORK (despite comments from non-fisho’s, you are NOT making ‘adult toys’)
If you have considered handcrafting your own timber poppers you’ve probably already developed some pretty good ideas as to what timber you want. Timber needs to have two key characteristics: buoyancy (obviously) and a nice tight grain so that it performs well on the lathe. Red Cedar is great, which you probably know, but it is not readily available. Surian Cedar, on the other hand, is easier to come by, and ticks all the boxes. For a nice, big, gutsy GT popper you will want a piece of square timber that is at least 50mmx50mm and about 200mm in length (we’re talking big bad poppers here!), which virtually guarantees zero wastage.
Securing the timber in the lathe is a basic process, however you have to get it right. On each end of your block saw shallow marks diagonally from corner to corner and centre punch the middle. Regardless of your spindle/tailstock configuration on your lathe, you will always use either the centre point of the saw marks, or the saw marks themselves to ensure the wood is as close to dead-centre as possible. An unbalanced piece of timber on a small lathe can vibrate intensely and can cause accidents once you start carving, so get this right!
Carving the timber into a nice popper shape is a lot of fun-but it’s also the result of a high tensile blade working against high-speed rotating wood; sound technique is critical. The tool rest must be set close to the timber so that as it rotates, the nearest edge of the timber clears the rest by only a couple millimetres (think very close). The carving tool (gouge) is then positioned on the tool rest angling up and towards the timber on a diagonal (see picture). The wood does all the work here and the aim is to gently introduce the carving tool to the rotation of the wood (maintaining an upward angle of the blade) and, with a very subtle, partial rotation of the gouge, allow it to travel the length of the tool rest as it cuts the wood. Work in one direction over and over until you are comfortable, then try cutting back and forth. You may have to stop and reposition the tool rest closer to the timber as you begin to get the piece down to a ‘round’. This ensures that you can keep the gouge angled upward for greater control.
Beginning the shaping process can be daunting without a definite idea of what you expect to be looking at once the timber stops spinning. I have experimented with many popper ‘profiles’, and eventually settled on what has become known as my Bommie Knocka shape. Without getting into the technicalities of popper design, such as ballasting, allow me to suggest that you simply try the same shape I use as a starting point. Once the timber is perfectly round, begin making the front half of a shallow neck about 1/3 of the way along the timber. Then complete the neck from the other direction (you should always cut downhill). Everything beyond the neck is really just part of the tail, which is approximately ½ the entire length of the popper. The whole tail should be narrowed so that it is thinner in diameter to the front of the popper, but certainly not quite as thin as the neck of the popper itself. The 40mm of the tail must now be gradually narrowed off until it is no more than about 15mm in diameter. A firm rub with 120 grit sandpaper while the lathe is spinning will do wonders to even out any imperfections left by the gouge. Follow this with a light rub of 400-600 grit and finish off the sanding process by burnishing the popper with either a handful of sawdust or the reverse side of the sandpaper; it should shine.
Before removing the popper from the lathe, I highly recommend drilling an 8mm hole in the middle of the neck of the lure approximately the same depth as the radius of its cross section. This will become the belly hole that houses a swivel connection to the through wire on which you will attach your preferred hook configuration.
STEP 4: FINAL SHAPING ELEMENTS (feeling stoked that you have something that truly resembles a popper)
We’re not done just yet! Once the popper is off the lathe it still lacks a number of vital ‘shaping’ elements, namely the creation of a voluminous cup, a neat tail weight cavity, and a central hole for the through wire.
Best practice at this point is to address the tail weight cavity. If you can access a drill press (happy days) this virtually guarantees a neat, accurate result, otherwise let’s hope your cordless drill abilities are surgeon-like. Begin with the 12mm spade bit in the dead centre of the tail end of the popper (where the tailstock has left a conical indentation) and sink a hole roughly 25-30mm. Now, take your 3-4mm long range drill bit and continue this hole until you break through into the swivel or belly hole that was created in an earlier process. Finally, you are ready to create the cupped face…
When talking popper design, the cupped face is certainly a focal point. The standard cup in my design is relatively large at around 45mm in diameter. Developing a process of ‘cupping’ poppers was a stalling point for me as there are very few quick, efficient and neat approaches to this process. I eventually discovered a router bit called a core box bit that is basically a hemisphere-shaped bit that can be used in a cordless drill. The largest core box bit that I could find is 1 and ½ inches (37mm) in diameter, with a ½ inch shaft. I have had great success in simply holding a popper with a vice-like grip and carefully drilling into the face with the core box bit. With this bit you will want to gradually create a fairly deep cup (approximately 15mm) then sand the face back on about a 10 degree angle (the bottom is -10 degree camber from the top) which should achieve a shallower cup at the bottom reducing ‘bogging’ of the popper in the water and promoting greater forward spray. The cupped face will require some attention with sandpaper to bring about a smoothed appearance. Finish the shaping process by drilling from the centre of the cup through to the belly hole; with any luck your through-wire will happily travel in one end and out the other.
Shaping handcrafted wooden poppers is a lot of fun. There is no reason why you cannot experiment with all sorts of design ideas; I sure have! Natural variation is impossible to avoid when learning to handcraft lures and this is paramount to refining a tried and tested design. There is no doubt that the shaping process is the single most influential determinant of how the popper will perform in the water. However, durability and presentation is largely the result of a specific and well-prescribed sealing and painting regime. This aspect of lure making, which we haven’t touched on yet, is complex enough to warrant its own ‘how-to’ article. For now, I implore you to practice your wood turning skills and hopefully you have an awesome batch of home-mades ready and waiting by the time Part 2 of A Hobbyist’s Guide to Handcrafted GT Poppers lands on your coffee table.


